I have been learning and teaching Python for over 5 years. Even though I am good at the core language I hadn’t been sure how to put it into use for myself and others. I also find AI fascinating. I am into theater and filmmaking. Things I wonder are, is it possible to use AI to automate some of the things I do such as video/audio editing or picking up the best clip from a collection of shooted video clips, or how to find if the actor is vulnerable? I don’t know how to answer these questions at the moment. When I came across Jeremey Howards’ Deep Learning For Coders course, I felt reassured that at least I could try and get my hands dirty. So I am on my journey to finding answers.
Aim
Following the suggestion from the book’s second chapter, I will write a tutorial on how to train a model to recognize if a facial expression is happy or otherwise. I am an asbolute beginner. I shall start remembering the Latin proverb Errare humanum est. This process is more for me to reinforce my learning than teaching someone else. But I would be happy for any comments, corrections, or suggestions to improve. We’ll be using Fastai Python modules for our study.
Data Collection and Preparation
We need data to train a deep-learning model. We need pictures of people - maybe close-ups of faces - happy faces and others containing sad/neutral/angry etc. There are plenty of images on the web that we could download and use. To download images we can use the Python module duckduckgo_search.
from duckduckgo_search import DDGSDDGS().images('happy face close up', max_results=1)
[{'title': 'Close up of teenage girls smiling face - Stock Photo - Dissolve',
  'image': 'https://cdn6.dissolve.com/p/D943_39_538/D943_39_538_1200.jpg',
  'thumbnail': 'https://tse3.mm.bing.net/th?id=OIP.rTxUVyjU0pqpUPEeqtmcCgHaE8&pid=Api',
  'url': 'https://dissolve.com/stock-photo/Close-teenage-girls-smiling-royalty-free-image/101-D943-39-538',
  'height': 800,
  'width': 1200,
  'source': 'Bing'}]
The key image points to the URL to download the image. Rather than indexing the results by ourselves fastcore module provides an object L to do this process much more easily.
from fastcore.allimport*L(DDGS().images('happy face close up', max_results=1)).itemgot("image")
Here we have created an L object by initializing it with the search we did earlier and using the itemgot method. Now that we have the URL for the image we can download it using download_url provided by fastdownload
from fastdownload import download_urldownload_url(L(DDGS().images('happy face close up', max_results=1)).itemgot("image")[0])
106.69% [81920/76781 00:00<00:00]
Path('D943_39_538_1200.jpg')
We can rewrite the above code into a function and use the following logic to create the downloaded files into a given folder on our computer.
from fastai.vision.allimport*def search_images(term, max_images=30):print(f'searching for {term}')return L(DDGS().images(term, max_results=1, region='wt-wt')).itemgot('image')searchTerm ="kids wear goggles close up"path = Path('./')dest = (path/'happy')dest.mkdir(exist_ok=True, parents=True)download_images(dest, urls=search_images(searchTerm))
searching for kids wear goggles close up
Here Path is a pathlib object which has come through the fastai vision library, which we can use, to create and manipulate directory or file paths. All the images we download will be placed inside the happy folder in the current directory. Increase the max_results to get more files in a given run. I am going to manually inspect and remove unacceptable images. I have about 150 images in the folder. I have deleted emojis etc. keeping only images of people smiling, laughing, etc - individual faces. Since we are mainly interested in recognizing facial expressions we are going to crop the images around the face using the autocrop python package which can recognize faces in images in a folder and crop around the faces.
!pip install -Uqq autocrop
We can run autocrop from the command line as below. -r which abbreviates the rejected flag helps to remove the images into another folder whenever face recognition fails.
If some of the images are rejected, we could download more images and do autocrop again. We’ll also need a similar number of images in the other folder which falls in sad/angry/neutral etc categories. Once we obtain that we can zip the images and upload them to Kaggle for training the model where we can use GPU resources to make the process faster.
!zip-r merge.zip merge_data
The data is available in the following directory on Kaggle, containing two folders happy and other. We have set the path to the top directory merge.
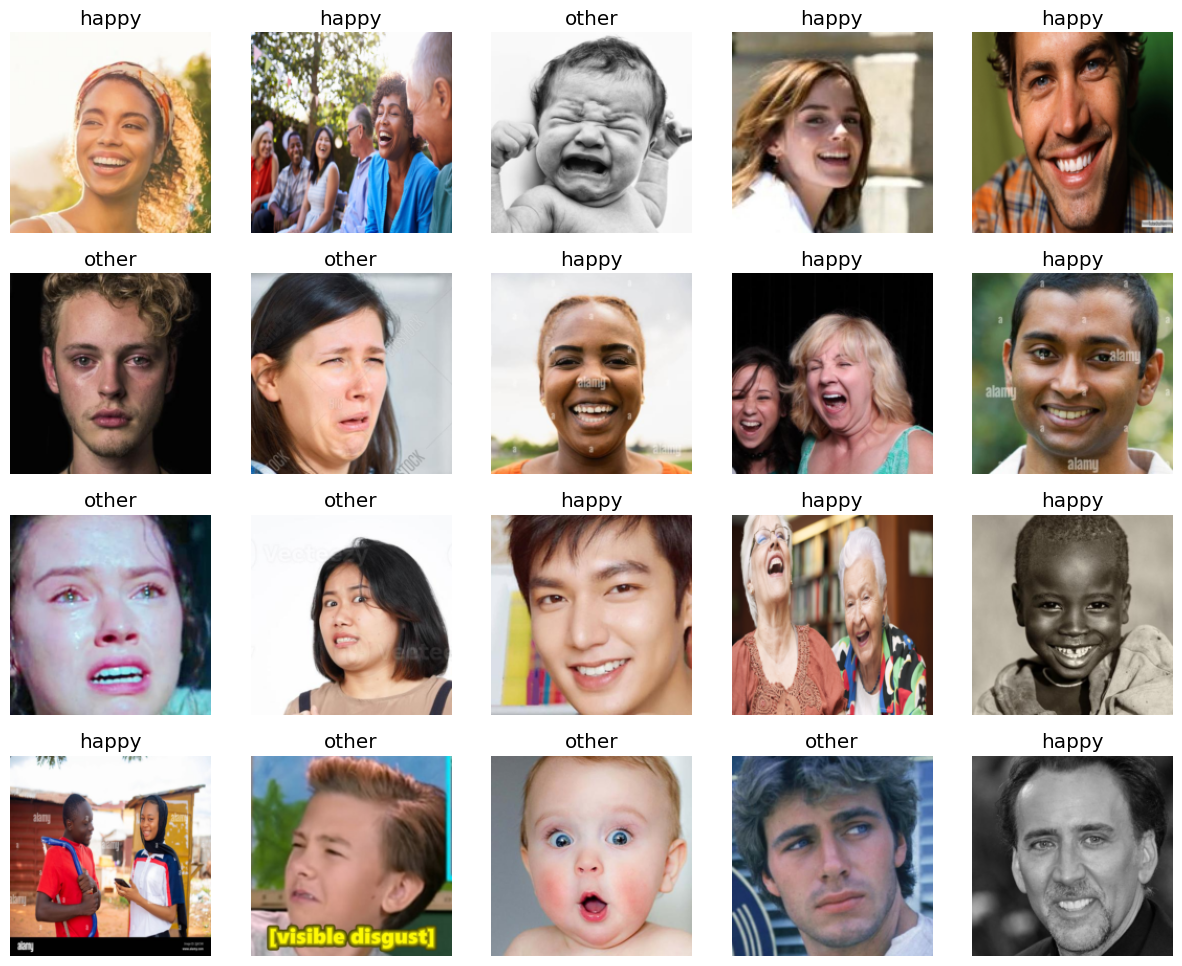
It is time for us to load the data into fastai. We’ll use the DataBlock object for this purpose. Since we are dealing with images and we need to label the data as happy/other we use ImageBlock and CategoryBlock respectively. get_image_files would go down recursively inside both folders and pick up the images. We need to train the model and also evaluate our results so we use RandomSplitter to keep 20% of the data for validating our results. We are passing seed=42 to the random generator so that every time we run we get the same split. parent_label helps us to choose the label for each file as the name of the folder which is happy and other. We need to keep all images to the same size so we resize the images by squishing them into 192x192 pixels using Resize.
Here show_batch helps us to look at the dataset. Now it is time for us to train our model. We’ll do it as shown below. We use the vision learner and pass the datablock to it. We are using the model resnet18 which is a pre-trained model that would help the fitting process go faster as it already knows quite a lot about images like detecting edges and gradients and so on. error_rate will tell us how well our model is performing.
Downloading: "https://download.pytorch.org/models/resnet18-f37072fd.pth" to /root/.cache/torch/hub/checkpoints/resnet18-f37072fd.pth
100%|██████████| 44.7M/44.7M [00:00<00:00, 172MB/s]
epoch
train_loss
valid_loss
error_rate
time
0
1.025875
0.637977
0.234899
00:13
epoch
train_loss
valid_loss
error_rate
time
0
0.594999
0.463941
0.171141
00:09
1
0.324277
0.429459
0.154362
00:09
2
0.179810
0.449198
0.154362
00:10
Here we have used to fine_tune to fit the model on the dataset. Deep learning neural net consists of several layers. As mentioned we are using a pre-trained model. What we do here is to train only the last few layers called the head and freeze the rest of the layers which already know how to recognize edges, textures, etc. Once it does that then it unfreezes the layers and does a fit on the entire layers. fine_tune also does differential learning by applying a higher learning rate on the head layers. Since our error_rate looks good about 1%, we can now test the model on some test set for which we’ll pick up images outside the train/validation set. We can grab an image from the internet and proceed.
To upload a file into the notebook from our computer we could use ipython widgets which are available to us through fastbook.
!pip install -Uqq fastbook
from fastbook import*
uploaded = widgets.FileUpload()uploaded
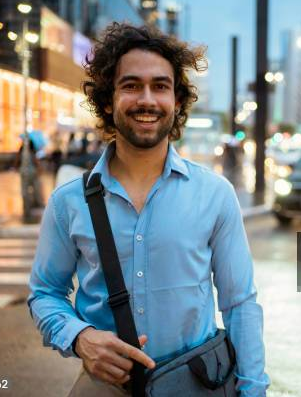
We can click on the upload button above and choose the file we want. I have used a newly downloaded image for testing giving some new queries on Google image search which I haven’t used while creating the training dataset. To view the image in ipython we can use the PILImage module which is available to us through the fastai vision module.
The binary image file data is available to us through the bytes object uploaded.data[0]. We pass this into PILImage and create a smaller image using to_thumb method.
We are going to crop the image around the face as we have done during the data preparation phase. Instead of using autocrop as a command line utility we could also import it as a Python module and do the cropping. Here we create a Cropper object and call the method crop on it. Our img needs to be converted from pilimage type to a numpy array which we do using numpy. Finally after cropping we create pilimage again so that we can pass it on to the learner.predict.
from autocrop import Cropperimport numpy as npcropper = Cropper()cropper.face_percent =90arr_crop = cropper.crop(np.array(img))if arr_crop.any(): img_crop = PILImage.create(arr_crop[..., ::-1]) # the rgb is handled differently in numpy and PILimg_crop
learn.predict(img_crop)
('other', tensor(1), tensor([0.0026, 0.9974]))
We see here that our model has predicted the image to be other. It is a beautiful picture, but it doesn’t look happy, I agree with the model! We are going to pick up a happy picture from the web upload it and test it.
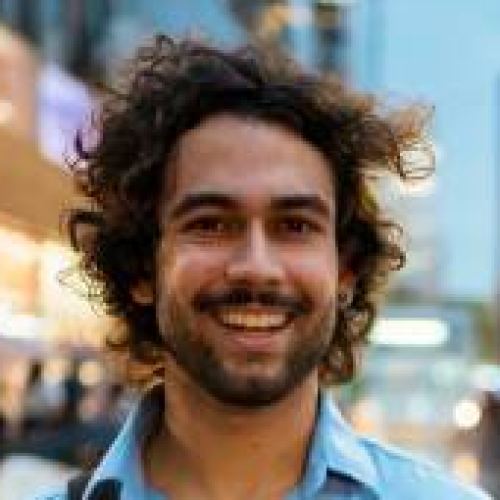
from autocrop import Croppercropper = Cropper()arr_crop = cropper.crop(np.array(img))if arr_crop.any(): img_crop = PILImage.create(arr_crop[..., ::-1]) # the rgb is handled differently in numpy and PILimg_crop
learn.predict(img_crop)
('happy', tensor(0), tensor([0.9989, 0.0011]))
Our model seems to work well. This image is rightly predicted to be a happy one.
Conclusions & Future Directions
We have prepared the happy/other datasets, trained a model, and tested it using fastai modules. Our model seems to work well in recognizing happy faces. In Indian theater/dance, we have navarasa meaning 9 expressions. So I would like to extend the model to be able to recognize more facial expressions say happy/sad/others. Thanks a lot for reading and comments/suggestions are welcome!